
USER MANUAL
DLA116 UAV ENGINE
Shangdong Feiao Aircraft Engine Co.,Ltd
1.Legal Disclaimer / Attention / Risk
1.1. Legal Disclaimer
1.2. Attention:Personal Safety Risks
1.3. Risk Prevention of Engine damage
1.3.1. The structure
1.3.2. The bad lubrication
1.3.3. The bad cooling
1.3.4. Improper power matching
1.3.5. Unpredictable Risk
2.Product Introduction
2.1. Technical Specifications
2.2. Dimensions
2.3 Packing Details
3. Assemble the engine
3.1. Opening the package
3.2. Assemble the engine
3.2.1. Install the exhaust pipe
3.2.2. Install the air filter
3.2.3. Install the Spark Plug
3.2.4. Install the stand off
3.2.5. Install the propeller
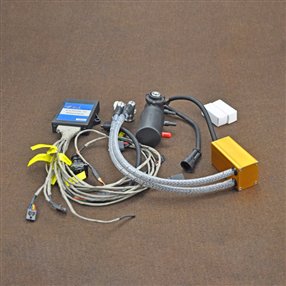
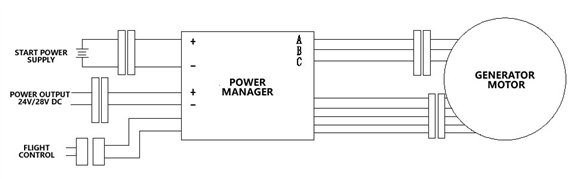
4. The Generator System
4.1. Circuit Diagram
4.2. Assembly Wiring Diagram
4.3. The Indicator of Power Manager
5. Injection System
5.1. ECU Install
5.2. EFI Software
5.2.1. Install the Soft on Computer. ( please contact with us for the software).
5.2.2. Install driver process
5.2.3. Install Update Files for Matching Different Propellers
5.2.4. Adjusting Throttle Servo Range
5.3. Pump
5.3.1. Induction.
5.3.2. Install the pump (It is very important.)
6. Engine Starting
6.1. Carburetor Version Engine
6.1. Carburetor Tuning and Care
6.1. Injection & Starter Version Engine
Engine Maintenance
7.1. Carburetor Version Engine Maintenance.
7.2. EFI Version Engine Maintenance
7.3. Overhaul Time
Engine Problem Shoot
DLA Warranty Policy
Factory Contact
1.Legal Disclaimer / Attention / Risk
When the consumer begins to use DLA engines, the consumer acknowledges and agrees with, and to, the terms and conditions listed in the safety and legal disclaimer sections of this manual. If the consumer does not acknowledge and agree to the terms and conditions, return the engine to the place of purchase for a refund.
This engine is not a toy! Serious injury and /or death can occur from its misuse! READ and become familiar with this entire instruction manual. LEARN the engine's applications, limitations, and possible hazards. This is not a certificated aircraft engine! It has not received the safety and durability testing specified by aircraft standards. It is only for use in uncertificated experimental aircraft or vehicles when there is no risk for the safety due to an engine failure. The user is taking all risk resulting from the use of this engine and he is aware of the possibility of sudden functional disturbances.
DLA is not responsible for any loss, injury or damage resulting from the use of its products.
1.2. Attention:Personal Safety Risks
Keep all spectators at least 30 feet away from the engine while operating the engine.
2. Do not put anything (e.g. fingers, body parts, objects, et al) into the rotating propeller
3. Wear proper apparel. Do not wear loose clothing, gloves, neckties, jewelry, or neck straps ,which may get caught in the moving propeller.
4. Always wear eye protection when starting the engine.
5. Inspect engine mount bolts and firewall integrity before operating the motor.
6. Turn off the engine and cut the power supply before making any adjustments.
7. Always use the proper size and well-conditioned propeller.
8. Always use the correct length propeller bolts and make sure they are tight before every flight.
9. Remember to keep engine fuel in a safe place, away from any sparks, excessive heat, or anything which could ignite the fuel. Remember that gasoline/mixture is highly flammable and must be handled with extreme caution. Do not smoke while running or operating the engine. Keep a fire extinguisher handy in case of emergencies.
10.There is a risk of poisoning when starting the engine in a poor ventilation environment, and it should maintain the air expedite, as in the enclosed environment, the personal will inhale the harmful exhaust, which will cause the casualties.
11. Do not run the engine near loose material such as dirt, gravel, power cords, ropes, sand, etc. Loose material can be drawn into the turning prop causing injury or damage.
12. The engine with starter and alternator has the capacity of self-starting, so it has the risk of starting by accident. So, when beginning operation, please pay more attention on the order of electrify. First, should electrify the receiver, meantime, should make sure that control signal is under the range in which the motor stopped (under 1400). And then the last step to connect the starting power supply. When stop operation, should cut off the starting power supply first, and then cut off the other power. To avoid the accident engine starting caused by the external signal because of no control signal.
1.3. Risk Prevention of Engine damage
When start the engine, to make sure the screw is fixed tightly and the firewall is well, the import point is that the screw of the propeller should be tight properly but attention not cracked
1.3.2. The bad lubrication
Should be used the certifies oil, and fixed it according to the requirement (the 2T fully synthetic oil and low grade gasoline. The Lubrication is 25:1 for trail run and 35:1 or 40:1 for normal flying.
When trail running, please pay more attention that the temperature of the cylinder should less than 120 degree centigrade. If use the pulling propeller, the time of it running in the highest speed cannot be more than 5 minutes, If using the pushing propeller, the external forced ventilation is required, and the area of the firewall should less than the area of the back of the engine, meanwhile, should make some holes on the firewall to radiate and maintain air expedite.
When the aircraft rises in the highest speed, the whole time should not be exceeded 15 minutes. So, you can control the aircraft rises in stages to avoid the engine destroyed cause by overheat.
1.3.4. Improper power matching
To use the propeller of proper size, then flying, the cruise power should more than 10% and less than 70%, and the RPM should be between 5000 and 5500. If exceed this speed, please change the proper engine and propeller. The continue time of idling should less than 15 minutes to avoid the carton deposition. The throttle can't be opened quickly, which can cause engine stop easily.
Flameout in flight. Any dynamical system has the rise of flameout in flight. It can be occurred because of the engine overheat, carbon deposition, frozen, the tank cavitation, the air resistor and some trouble with the controller. When flameout in flight happened, it will threaten the safety of the people in ground. The aircraft should have the protection in emergency, such as self-destruction, diversion, parachute opening, etc. We should take multiple means to ensure the flight safety, and can’t only rely on the engine. Each time before flying, should check the engine and the aircraft carefully.
2.Product Introduction
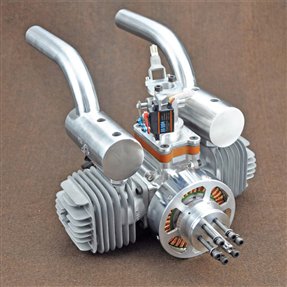
Above photo is DLA116UAE.
DLA116U
Exhaust Amount | 116cc | Main Engine weight | 2460g |
Power | 12HP | Ignition weight | 180g |
Idle speed | 1300rpm | Stand offs mount weight | 22g*4 |
Puller Force | 27KG/50m altitude | Muffler weight | 127g*2 |
Compression Ratio | 8:1 | Max.Fuel Consumption | 5.14/h |
Exhaust Bore/Stroke | 46mm*35mm | Spark Plug | Iridium |
Test Propeller | 28*10 | Starting Power Source | 2S 6.6~8.2V Lipo battery |
Recommended Propeller | 29*10、28*10、29*8、28*8、27*10 | ||
Lubrication Ratio | 25:1~30:1(trial run) 40:1~50:1(normal flying) | ||
Fuel/ lubrication Oil | 2T gasoline (Octane<93) / 2T fully synthetic oil | ||
Advantage of Carburetor | Stable performance. Easy to use. Long service life. Strong power and low price. Stable acceleration performance. Simple and compact structure, small size, convenient maintenance. Suitable for altitude below 3000m. | ||
Notes | The ground test shall be equipped with air filter. Take care to prevent dust and impurities from being sucked into the carburetor. Do not adjust the mixing ratio screw. If you need to adjust, please contact with us. |
DLA116UA
Exhaust amount | 116cc | Power | 12HP |
Idle Speed | 1300 rpm | Pulling Force | 26kg/50m altitude |
Exhaust bore/stroke | 46mm*35mm | Compression ratio | 8:1 |
Propeller/max fuel consumption | 27*10/ 5.29L/h | Spark Plug | Iridium |
Weight of Electrical system | Motor:744.5g Power Manger :410g | Starting Power Source | 6S/7S lipo battery |
Weight of main engine and parts | Engine:2460g, Muffler:127g*2, Standoffs:22*4g, Ignition: 191g | Lubrication Ratio | 25:1~30:1 (trial run) 40:1~50:1 (normal flying) |
Recommended propeller | 29*10,28*10, 29*8, 28*8, 27*10 | Auto-Starting Function | Yes |
Alternator Output Voltage | 24V/28V | Alternator Output Power | 400W/600W |
Fuel/ lubrication Oil | 2T gasoline (Octane<93) / 2T fully synthetic oil | ||
Advantage of Carburetor | Stable performance, Strong power and low price. Easy to use, long service life, convenient maintenance. Simple and compact structure, small size. Suitable for flying altitude below 3000m. | ||
Notes | When test engine on the ground test, it shall be equipped with air filter; Take care to prevent dust and impurities from being sucked into the carburetor; Do not adjust the mixing ratio screw. If you need to adjust, please contact with us. |
DLA116UAE
Exhaust amount | 116cc | Power | 12HP |
Idle speed | 1300rpm | Pulling Force | 25.8KG/ altitude 50m |
Exhaust bore/stroke | 46mm*35mm | Compression Ratio | 8:1 |
Propeller/max fuel consumption | 28*10 /4.19L/h | Spark plug | Iridium |
Weight of electrical system | Motor:753g power manger:410g | Starting Power Supply | 24V~45V 6S/7S/8S lipo battery |
Weight of main engine and parts | Engine:3270 g,muffler: 127*2g,stand off:22*4g,ignition:191g | ||
Weight of EFI System | ECU:182g Pump: 234g | Recommended Propeller | 29*10、28*10、29*8、28*8、27*10 |
lubrication Ratio | 25:1~30:1(trail run) 40:1~50:1(normal flying) | ||
Fuel/Lubrication Oil | 2T gasoline (Octane<93) / 2T fully synthetic oil | ||
Alternator output | Optional 24V/28V 400W/600W | Auto-Starting Function | Yes |
Advantage of EFI System | EFI engine with many good performance characteristics, high power, oil - saving, low noise, not easy to extinguish, only once ignition. ECU can automatically adjust the ignition time, fuel injection volume and idle control according to engine temperature and altitude | ||
Notes | In order to make the engine performance to the best. The fuel pulse width must be calibrated on the special test bench according to the corresponding propeller size. Please contact with us before purchase. |
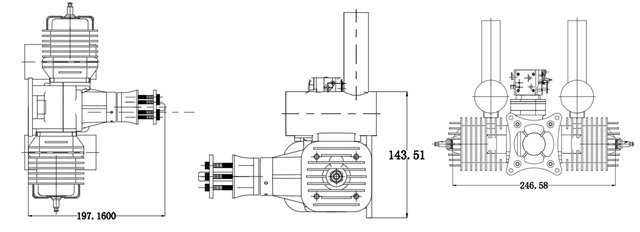
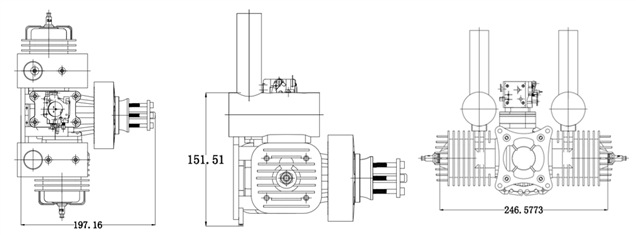
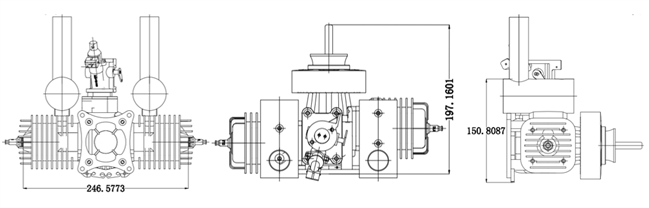
2.2. Dimensions
DLA116U
DLA116UA
DLA116UAE
2.3 Packing Details
Packing Details | ||||
| DLA116U | DLA116UE | DLA116UA | DLA116UAE |
Main Engine With Carburetor Assembled | 1 | × | × | × |
Main Engine With Carburetor and Generator Assembled | × | × | 1 | × |
Main Engine With Injector Assembled | × | 1 | × | × |
Main Engine With Injector and Generator Assembled | × | × | × | 1 |
Muffler | 2 | 2 | 2 | 2 |
1 | 1 | 1 | 1 | |
Spark Plug | 2 | 2 | 2 | 2 |
Muffler Gaskets and Screws set | 1 | 1 | 1 | 1 |
ECU for Injection System | × | 1 | × | 1 |
Pump for Injection System | × | 1 | × | 1 |
Power Manager | × | × | 1 | 1 |
Airfilter | 1 | 1 | 1 | 1 |
Test Sheet | 1 | 1 | 1 | 1 |
Please open the package on the clear platform, to avoid the failure to start because of the dopant falling in the engine.
Please check if all the accessories are complete according to the packing list, especially the small part. If some missing, please check if it falls into the crankcase because of the long-distance transport.
Check the appearance. Check whether there is obvious impact on the appearance of engine, if the serial number of the engine is same as it in the packing list, and the winding of the alternator is intact without breakage.
For convenience of transport, after testing, the exhaust pipe and air filter will be disassembled, and need assembled by yourself. So before assembling, please check the engine carefully. Please contact with us if any doubt.
3.2.1. Install the exhaust pipe
Before install, please check if there are any sundries in the cylinder and exhaust pipe. Put the exhaust pipe, the gasket, and the exhaust port of the cylinder in line, and then tighten alternately the screws. Tighten again when fully preheating after starting the engine. Be noted that the gasket of the exhaust pipe breakdown mainly because of the screw lengthen after heated and cause the less of the press force.
To check if there are any sundries in the air filter and the throttle.
If the air filter is diamond, tighten the screws to fix the air filter.
If the air filter is round, please twisted off the lid, remove filters, then tighten the screws to fix the air filter.
To screw the spark plug by hand at first, then use sleeve to tighten.
Fix the stand offs on the firewall at first. Then fix to the engine with screw to stand offs. The screw glue should be used to avoid loose because of the shaking. Take care of the outgoing line, do not bend it back and forth.
Recommend to install the engine to the aircraft by semi-rigid connection. If use flexible connection, it will reduce the work life of the engine and cause the idle speed unstable.
Please check if there is crack and scar on the appearance. Use the tool to check the balance of the propeller. Use of the unbalance and defective propeller is strictly prohibited.
There is steel wire barrel in the screw hole of the prob base, no need to use screw glue.
The wooden propeller will transformation gradually, which will cause the screw loose. Check the propeller carefully before flying each time, as the loose of the screw maybe cause the screw broken, which will lead to the accident of propeller flying out.
Check at first
Checking if there is any metal or sundries between the rotor and stator. Unload the spark plug, turn the rotor by hand to feel if it is turn smoothly.
According to the showing above, connect all the line and plug. Test as the below sequence.
1. First test it without electricity. Take off the spark plug, and take the no-load rotation test.
2.Test with electricity. If there is no problem with no-load test, we can test it with electricity. First electrify the receiver, meantime, should make sure that control signal is under the range in which the engine stopped (under 1400). And then to connect the power supply. When it flying, it also should be as this sequence.
3.After finished above, we can take the starting test. When giving the starting order, the generator should turn smoothly, and the engine without any unusual voice and shaking.
4.Test with load. It will be doing with the propeller, but didn’t supply the power to the ignition system. When get the signal to work, the generator will stop for about 0.5 seconds at the TDC, and then turn smoothly. The start time of test with load cannot be exceed 5 seconds, and it needs to be 10 seconds more between two starting. If the generator cannot work after 0.5 seconds stop at the TDC, we should stop the starting, to avoid the controller was destroyed because of the electricity.
5.After testing with loaded, can supply power to the ignition and EFI system to making the start test. If the engine can work after 3 second after getting the signal of starting, then the starter and generator system can be used normally.
6.If the Flight Control System can control the signal, the ignition signal can be given 0.5seconds later than the start signal. At this time, the engine has accelerated the rotation, so it is not easy to cause the regurgitation, and the starting can be smoother.
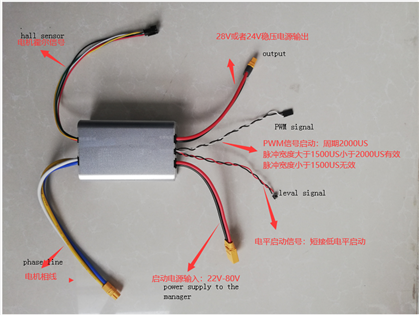
4.3. The Indicator of Power Manager
4.3.1. the electrical parameters:
* the range of the power supply input voltage :24V-60V
Engine No. | DLA32 | DLA 58 | DLA64 | DLA116 | DLA180 | DLA232 | DLA360 |
Input voltage | 24-60V | 24-60V | 24-60V | 24-60V | 28-60V | 36-60V | 48-60V |
* the peak bus current when start:<80A
* the max generator voltage input to the manager:74V(AC)
The highest PRM:
Item no. | DLA32 | DLA58 | DLA64 | DLA116 | DLA180 | DLA232 | DLA360 |
The highest RPM | 8000 | 8000 | 8000 | 6500 | 6200 | 6200 | 6200 |
* start time:<=3 second
* the output from power manager: for 28V, the output is 28+-1V,
for 24V, the output is 24.5-24.7V
The biggest output current: 28V 600W <20A
24V 400W <17 A
* the temperature range for work:the lowest is -20℃, the the highest is 60℃
4.3.2 operation method
* when the power manager contected with the power, the green light and red light will come on on same time for one second, and then the green light will on all the time, it means that can start. If the green light is off, while the red light is on, it means there is something wrong the power modules, and can’t start.
If the red light flashes 5 times and goes out for 2 seconds, there are two possible reasons: one is the damage of the Hall element of the motor; the other is the connection between the Hall sensor of the motor and the power manager
* Start: When the green light of the manager is always on and no fault is indicated, after pressing the start button or sending a PWM start signal, the manager will start the motor to drive the engine, and the maximum duration is 3 seconds, and the manager will automatically quit the start. If the start is not successful in 3 seconds, the start operation needs to continue.
The time between the two times to start operation should be more than 3 seconds, if it is less than 3 second, the power manager will be not responded to the startup command.
Two kinds of efficient start signals
***One is level signal, the low level signal is valid, or you can press the start button directly
***The other is PWM signal, with the period 2000US, The pulse duty factor is effient when more than 1500US and less than 2000US. It will be noeffient when less than 1500US.
When start the power manger, the green light will flash to indicated the start operation. Note: When the engine is running, and the speed is lower than 3000RPM, if the power manager receives the start command , it will continue to re start, but if the engine speed is more than 3000RPM, the manager will not perform the start operation.
*the output: when the engine start, for engine DLA32, DLA58,DLA64 , the RPM is more than 4000, and for the engine DLA116, DLA180, DLA232, DLA360, the RPM is more than 2300, the regulated power supply start working . At the same time, the green light will flash slowly to indicate the generator state.
NOTE:1. for the 28V manager, the load current should be less than 20A
For the 24V manager, the load current should be less than 17A.
If you want to conntect the battery to the output port directly, the diode must be added to protect the manager, if you don’t add the diode, it will no output or the manager will be damaged.
4.3.3 The meaning of LED light:
The green light on all time: the manager is normal waiting state
The green light flash slowly: the starting state
The green light flash quickly: generator state
The red light on all time: something wrong with the manager
The red light flash for 5 times, and off for 2 second: something wrong with the motor sensor
The red light continue flash slowly: for 24V, of the supply power is lower than 22V, and for 28V, the supply power is lower than 26V, the red light flash slowly means that the battery is under voltage. Don’t start the engine in this situation, otherwise, it will influenct the work life of the battery.
4.3.4:Connection port defination
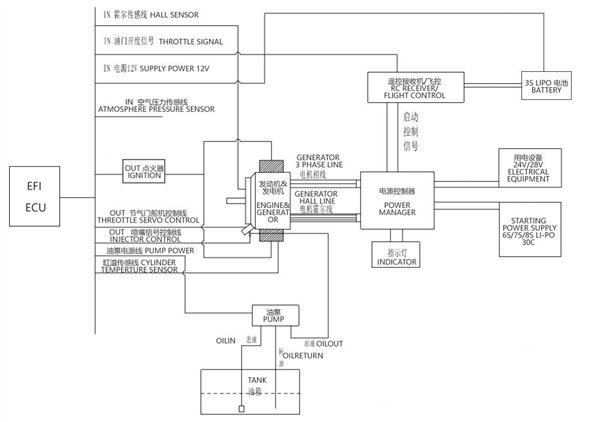
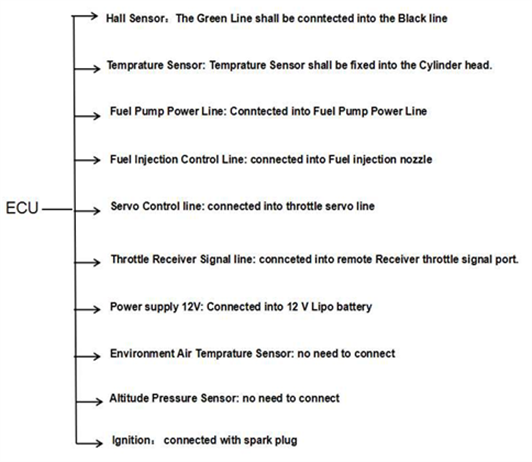
Injection System
1. The power source of ECU: 12V liPo battery, more than 3000mA.
2. Please connect all connectors and sensors. Refer to above Wiring Diagram and following list.
Please contact us for EFI software. We don’t suggest consumer to set EFI yourself. Please tell us your requirement of flight, we’ll provide the debugged software to you. You only need to adjust and confirm Flight Control on EFI soft.
5.2.1. Install the Soft on Computer. ( please contact with us for the software).
1. Decompression, there are four files:
“ECU SETUP”
“microsquirt-II” (It's the file for transformation from Chinese to English ).
“USB driver”
"Update files"
2. Install the ECU setup (ECU_setup V2.92). Choose "My EFI"
3. Copy file "microsquirt-II" to the Installation directory of ECU "C:program files MicroSquirt EFITune2.25 mtCfg
4. Start EFITurn again. Choose "My EFI".
1. Connect EFI to computer by USB.
2. Install USB drive software: "USB DRIVER CH341SER.EXE",
3. Open computer's "Device Manager". You'll find EFI port, check COM port (normally it's COM3. COM1-COM9 are available if COM3 is occupied)
4. Open EFITune, "Communications-Setting". You can find Port COM number, set this COM number to same COM number of "Device Manager"(such as COM3)
5. Check "Filesetting", File- "Offline" is not ticked.
6. Check all cables are connected, batter supply no problem.
5.2.3. Install Update Files for Matching Different Propellers
1.There are several files(.msq) are named as different propeller size number.
2. Connect USB. Open EFI software. Choose "My EFI"
3. File-open, choose matched “*.msq” file according propeller size
4. After 5 seconds, propeller matching successful.
Attention: As long as open EFITune, there is a choose every time, you only to choose "My EFI"
5.2.4. Adjusting Throttle Servo Range
It’s necessary to adjust your Flight Control and Transmitter System to match the EFI.
1. Connect ECU with battery and computer.
2. Open “My EFI”.
3.Right-Click,Choose “Swap To”,“IACgauge”. There will show the Throttle Servo Range number.
4. Adjust Flight Control or Transmitter System to meet the Throttle Servo Range 2000≤□≤3700.
5.3. Pump
Working voltage: 10.5V-15V.
Pump oil pressure :300kpa.
Material: PA66, aluminum alloy, silicon steel.
Fuel Tube Dia: OD 6.5mm, ID 4mm.
Notes: our pump only suit to DLA EFI and ECU system. It is not recommended to match with other system. If it is used and drove by other system, the power dissipation and heating maybe increased.
5.3.2. Install the pump (It is very important.)
1.The pump should be installed little lower than the lowest fuel level of the tank.
2.Fuel inlet and outlet ends should be set at the bottom oil line of the tank.
3.The input and output fuel tubes must be laid at the same level.
4.The oil filter weight block should be always in the bottom of tank and in the oil, avoid the air entering the tube when oiling.
5.Each time before starting, the oil tube and the pump must be full of oil without air. Don't start the pump suction directly for the first time, you must use external device (for example the hand pump) to fill oil in the pump, then you can use pump normally
6. Engine Use6.1.1 Carburetor Version Engine
1. Oiling the oil tan with filtered mixture oil.
2. Insure that your receiver and ignition batteries are charged, your receiver and transmitter are on, and that your throttle is set to low.
3. Close the choke and turn on the ignition switch.
4. Rubber stick is recommended to start the engine.
5. Begin flipping the prop through its compression stroke until the engine fires.
6. Wait for the propeller to stop spinning, turn off the ignition, and open the choke(s)
7. Switch the ignition back on and flip the propeller again until the engine starts
8. Warm up the engine for 15 or 20 seconds before advancing the throttle.
6.1.2. Carburetor Tuning and Care
The use of a tachometer is highly recommended. And, again, never adjust the needles while the engine is running!
Tuning
1. Using the tachometer tune the engine for maximum power with the high needle (H).
2. Using the tachometer again: richen the high needle (H) until the engine runs 100-200 RPM less than the maximum RPM. Now you should richen slightly on the high needle (H).
Keep the engine run at idle for 60 seconds. Insure that the idle RPM to be constant. If the low needle (L) is too rich, it may happen that idle RPM drops until the engine stops; Lean the low needle (L) until a constant idle RPM is achieved.
Check the transition with a quick throttle advance. It should sound like it is making quick steady power.
Care:
Your carburetor screen will need to be cleaned with clean gasoline and blow off with compressed air after every flight. Check the choke and throttle plates for tightness.
6.1.3. Injection &Starter Version Engine
1. Oiling the oil tan with filtered mixture oil.
2. Connect EFI system parts and install ECU (Refer to 5.1). Insure that your FC and Ignition batteries are charged.
3.Sent start signal till the engine start running. Each time start time less than 5 seconds, the next starting will be 10 seconds later.
4. After 15-20 seconds running, increase the throttle till the idle speed.
7. Engine Maintenance
7.1 Carburetor Version Engine Maintenance.
1. After returning to the ground, start engine again to consume the oil in the tube, close the oil supply, let engine flameout naturally.
2. Use carb cleaner to clean the carburetor after every flight finished. Then dry the carburetor.
3. Check Engine before every flight. Rotate the crankshaft, check the prop hub screws, check all gaskets.
7.2 EFI Version Engine Maintenance
1. Check Engine before every flight. Rotate the crankshaft, check the prop hub screws, check all gaskets.
2. Check injector before every flight. If you can keep oil clean to avoid the injector fouling. No need to maintenance EFI system every flight.
3. Long time no use, please use injector cleaner to clean the injector, while draw all oil from tank and pump, then seal up.
Overhaul time is not fixed, please check engine situation before and after every flight. Different overhaul time based on different flight environment.
Easily damaged parts: gaskets, cylinder, piston, piston ring, mufflers, admission valve, prop hub, prop shaft.
8. Engine Problem ShootProblem1. The engine is flooded.
Solution:
Remove the spark plug; turn the engine to a position where the fuel runs out and clean it.
Check the connections of spark plug, screws, restart the engine, if it failed to start again, please send it back to After-sale service center for repair.
Problem2. The engine starts after being choked but then stops soon after.
Solution:
The low needle on the carburetor is probably too lean.
Adjust the Low-End needle until you achieve a smooth idle and a reliable transition to high throttle. Generally, if the motor stutters or coughs in the mid-range or when the throttle is advanced, the low-end needle is too rich and possibly even the high-end needle.
Problem3. The engine runs rough and is vibrating strongly.
Solution:
Balance the propeller. Check the ignition timing. Check your plumbing for air/fuel leaks
Check your spark plug for carbon and check the spark plug gap. Check the engine mount to be sure it is rigid. Check to make sure the engine is mounted on a level surface so that crankcase is free of tension.
Check the engine and propeller bolts.
Problem4. The engine doesn't reach a normal RPM at full throttle.
Solution:
Check:
1. The carburetor settings.
2. See if the propeller is too large.
3. See if the engine is overheating.
4. The ignition timing.
5. The spark plug for defect.
Verify:
1. you have the correct muffler system.
2. you have the correct gasoline, oil, and have mixed them with the correct ratio.
Problem5. The pump is started but can’t suction.
1. Don’t connect injector, connect pump’s outlet to oil tank.
2. Cut the ignition. Rotate the crankshaft by hands to send signal to ECU, the pump will draw the oil.
3. Exhaust the air and bubbles of the pump.
4. Connect oil tube to the injector.
5. Start engine again.
9. DLA Warranty PolicyDLA UAV engines include a limited ONE YEAR WARRANTY ON MATERIALS AND WORKMANSHIP to the original purchaser.
This warranty does not cover the following:
• Damage caused by improper handling, operation, modifications, or maintenance.
• Damage caused by a crash.
• Damage caused by using improper fuel or additives.
• Damage incurred during transit to After Service Center.

Shandong Feiao Aircraft Engine Co., Ltd.
Address: NO.177 High-tech 6th Road, Donggang District, Rizhao Shandong, China.
Tel: 0086-633-7968381/7968386
Fax: 0086-633-7968386
Sales Email: sales2@dlaengine.com
Other Email: emily@dlaengine.com
www.dlaengine.com
| 1/16
|
|
|
|
